
I live in an almost 100 year old rental flat. I don’t have a smart doorbell and do not have the option to install one. Nevertheless, I would like to reap the benefits of a smart doorbell, especially being notified on multiple devices. This is e.g., useful when wearing headphones alone in home office and the post is outside, trying to deliver a parcel. I have missed that more than once.
Problem Statement
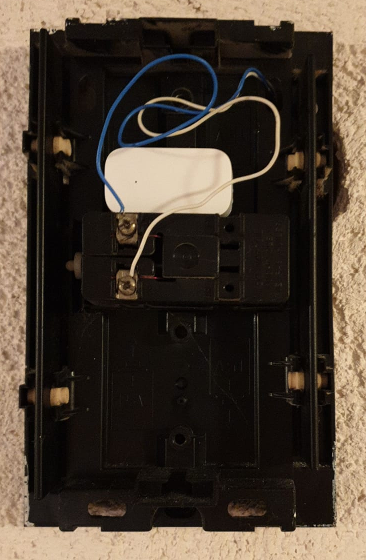
With a simple, wired, “ding-dong-style” doorbell, it is not easily possible to add this to your home automation network. These are wired directly from the switch at the door/gate to the actual bell making the sound. Looking at one of these old doorbells, you will discover that they are working by a spring and coil mechanism, that when activated moves a clapper, which in turn sounds an actual bell. In the one direction it goes “ding”, in the other, it goes “dong”. This is ridiculously cheap to build and lasts for decades or more.
Setup
The big advantage of this setup is that the rather strong magnetic field used to move the clapper extends beyond casing, at least if this is made of plastic, which is usually the case. We can pick up this signal with a door/window sensor. These are also magnetic and easily pick up on the magnetic field of the doorbell. You might have to try out a few different positions for the sensor, but likely you will find one that works. I am using an Aqara sensor on my 60+ year old doorbell:
Wrapping the sensor
Note that the magnetic field might cause multiple on/off cycles and we will need to debounce this. I will take a slightly different approach to my motion sensor, but some of the configuration below might look familiar. We will also wrap the open/close sensor with a new binary sensor that we can name accordingly and assign a new device class with states that fit a little nicer to a doorbell than “open” and “close”. However, the delay can be realized a little simpler than for the motion sensor.
Configuration
input_boolean:
  doorbell_raw:
    name: Doorbell Raw
    initial: off

binary_sensor:
  - platform: template
    sensors:
      doorbell:
        friendly_name: "Doorbell"
        value_template: >-
          {% if is_state("input_boolean.doorbell_raw", "on") %}
            on
          {% else %}
            off
          {% endif %}
Since HA does not allow us to directly set the state of the sensor, which is generally a good idea, we need to use an input_boolean instead. It would be possible to set the sensor values via a Python script, but I try to avoid third-party plugins, if I can. Maintenance can be an issue, especially with fast-moving software like HA.
I declare an input_boolean, which in turn is wrapped around by a binary_sensor, the “virtual” doorbell sensor. Technically, the input_boolean is enough for everything we do here. However, declaring a binary_sensor allows us to easily look and act like a sound sensor, when changing the device class the customizations:
Customization
binary_sensor.doorbell:
  device_class: sound
Here, I set the device class, making sure that states are named on/off, the icon is adjusted, etc.
Automation
Now the new input_boolean needs to be connected to the original sensor, in my case binary_sensor.openclose_29. This is done via automations.
- id: doorbell_pressed
  alias: Doorbell Pressed
  trigger:
  - entity_id: binary_sensor.openclose_29
    platform: state
    to: 'on'
  action:
  - service: input_boolean.turn_on
    data:
      entity_id: input_boolean.doorbell_raw
  - delay: 00:00:02
  - service: input_boolean.turn_off
    data:
      entity_id: input_boolean.doorbell_raw
There is one little trick in here: The turning off of the sensor is ignored and the input_boolean is turned off only after a delay, in this case 2 seconds. Thus, if within two seconds, the on/off cycle is detected multiple times, this has no effect, as an additional trigger on a running automation is by default ignored. The input_boolean.doorbell_raw will remain on. This debounces the clapper moving, and also rapid doorbell pressing.
Usages
The doorbell can be used for many applications. The first thing that comes to my mind is of course a notification, so I am alerted also when I don’t hear the doorbell, e.g., when wearing headphones:
- id: doorbell_notification
  alias: Doorbell Notification
  trigger:
  - entity_id: binary_sensor.doorbell
    platform: state
    to: 'on'
  action:
  - service: notify.all
    data:
      message: Open the door
      title: Doorbell rings!
If you have a webcam and a Raspberry Pi or some similar setup, you could point the webcam to the door and take a photo of your entrance, whenever the doorbell is pressed. You could of course also show a livestream from the camera on one or all of your media players. Make sure you follow your countries data protection policy when doing this. Not everyone is allowed to record public spaces everywhere at all times.
You could also alert a little stronger by flashing some lights or changing their color, rather than just via a notification. For me, the notification is sufficient.
In case I am currently watching TV or a movie, I don’t want to have to deal with that first, but rather quickly rush to the door, the post does not wait long. So I just pause the TV, Kodi timeshift will take care that I don’t miss anything, even when watching broadcast TV:
- id: doorbell_pause_tv
  alias: Doorbell Pause TV
  trigger:
  - entity_id: binary_sensor.doorbell
    platform: state
    to: 'on'
  action:
  - service: media_player.media_pause
    entity_id: media_player.kodi
Conclusion
It is not always necessary to buy a new “smart” doorbell. Aside from the cost, many of these run over the internet and one has to rely on the company offering the service and keeping the device secure. Often enough that has proven to not work. Instead, I just my old doorbell and make it smart. This is ideal for me, as a door/window sensor is less than 10 Euros and I am not relying on any online services.