
I have recently been getting more and more into the topic of home automation. It find it to be a very family-suitable topic, since once setup, it is easy and fast to integrate another sensor or add a new automation. This allows to also maintain and enhance the system if one only has rather short amounts of time.
In this article, I outline how to use the IKEA TRÅDFRI motion sensor in combination with Home Assistant. Surprisingly, this is not as straight-forward as it might seem.
Setup
I won’t discuss my setup in detail in this article, but only show a few aspects that are relevant for context.
All services are hosted in house, as I do not want to rely on internet connection, an operator providing its service also in a potentially (far) future, and like to keep my data private. For central control, I am using Home Assistant (HA). There are a number of other options out there, but HA was the first to support my Logitech Harmony Hub natively, allowing me to get rid of the abysmal Logitech app for it. The overall system consists of a number of nodes spread across a ZigBee and WiFi networks. For interaction with the ZigBee network I use a ConBee II by dresden electronic. Via deconz this is attached to HA.
Since I pass by IKEA on the way home from office, I tend to stop there every once in a while to have a look at the “As Is” section. Sometimes Tradfri devices show up there. Usually it is lamps, but sometimes I also find motion sensors. These are often priced around 7.5 Euros (i.e., 25% discount) a piece and are effectively new, as you can tell from the state of the original battery (labeled with Ikea). Another great resource for these motion sensors are classifieds portals, such as eBay Kleinanzeigen, where these trade at low prices, especially when buying in bulk.
Problem Statement
While I can acquire the Tradfri motion sensor relatively cheap, it does have some significant downsides when used with HA. While other motion sensors (e.g., Aqara), are acting as sensors-class devices in the ZigBee network, the Tradfri motion sensor acts as a controller. This is ideal for the purpose intended by IKEA, without hub or central home controller, as one can directly attach the motion sensor to lights without additional infrastructure needed. However, it makes it difficult for use in HA, as control input can only be observed indirectly, in this case. The control signals could be exposed by deconz as events, similar to remote controls, but for some reason this is not implemented. Instead they are exposed as sensor. This might be easier to understand for most users.
Additionally, the motion sensor is fixed to an interval of about 2 minutes and enforces this by sending a command “On with timed off” with a parameter of 3 minutes on ZigBee. Thus, there is only a single event sent when motion is detected, after which the motion sensor remains quiet for about 2 minutes. In case motion is detected within this time, the motion sensor will send the same event again, thus extending the time the light is on.
A fairly detailed, though rather unstructured resource on this sensor and its operation is issue #1676 in the deconz repo on GitHub.
Pairing the sensor
When pairing the sensor, you will notice some issues: Just after pairing, a number of your ZigBee devices are showing a wrong state (lights are on, windows are open) and control might not work correctly. This seems to be a hiccup in deconz, due to the fact that the motion sensor needs to be assigned to a group, whose state in turn is reflected as the state of the sensor. By default, group 0 seems to be chosen here. This needs to be adapted. Follow these steps:
- Make sure to have the sensor added as any other sensor (e.g., via Phoscon)
- Keep the motion sensor in a place where it does not detect movement for at least 3 minutes before doing the next steps, to make sure to trigger it only when we need it later.
- Make sure that the VNC interface for deconz is enable, e.g., in marthoc/deconz Docker container set DECONZ_VNC_MODE to 1
- Log into VNC interface,
: , password: DECONZ_VNC_PASSWORD - Activate the “Bind Dropbox”: Panels -> Bind Dropbox
- Find your sensor and select the right grey circle
- From the newly opened box, drag the “0004 Groups” endpoint to the “Source” box in the Bind Dropbox
- Change the group identifier to a free group (e.g., 0x0020)
- Trigger the sensor (e.g., by waving) and IMMEDIATELY, press “Bind” in the Bind Dropbox. This should transfer the group setting to the sensor. It should be confirmed with a “success” message in the Bind Dropbox.
- Restart deconz and HA. The devices should reflect the correct state now.
Errors
A number of things can go wrong:
failure: timeout
This is probably the most common issue. Make sure that the sensor really wakes up, when you wave in front of it, e.g., by placing it against a wall before. The sensor does not always activate its ZigBee transceiver, only every 3 minutes. Thus make sure it is not triggered earlier.
failure: table full
I have seen this on one of my sensors and believe it is related to setting too many groups in my trials. I would expect that it is necessary to “unbind” a number of groups. But I need to evaluate further.
Wrapping the sensor
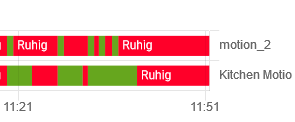
Now that we have have stopped the sensor from influencing the states of our other ZigBee components, we want to use it as well. As we can see in HA, this sensor behaves somewhat strange:

We notice that the sensor turns on for only a minute at a time and then remains off for some time, no matter if motion has been detected or not. This is due to the delay mentioned above. When using the sensor state as it is reported now, we would need to take care to always follow these intervals. Thus, turning on a light for one minute after motion has been detected and afterwards turning off, if no motion has been detected, might lead to irritating effects of the light turning on and off all the time, though there is consistent motion in the room. We can of course buffer this, by adjusting the light to the motion sensor, but we would need to remember to adjust every automation and use case to the motion sensor limitations. This adds complexity. It is also possible to add a light, which is bound to the motion sensor and automate based on that light. This seems somewhat overkill though, seeing that we already know the behavior of the sensor. I prefer to solve this challenge in software.
Instead, I decided to wrap the motion sensor with another “virtual” motion sensor, which correctly reflects the state as we expect:
This exercise is also a good example for learning the concepts of HA, as the most straightforward ways are not possible. Thus, one needs to understand the concepts underlying HA, e.g., that a sensor state can’t be set, and build the setup accordingly. We need the following:
Configuration
input_boolean:
  motion_kitchen_raw:
    name: Kitchen Motion Raw
    initial: off

binary_sensor:
  - platform: template
    sensors:
      motion_kitchen:
        friendly_name: "Kitchen Motion Sensor"
        value_template: >-
          {% if is_state("input_boolean.motion_kitchen_raw", "on") %}
            on
          {% else %}
            off
          {% endif %}
Since HA does not allow us to directly set the state of the sensor, which is generally a good idea, we need to use an input_boolean instead. It would be possible to set the sensor values via a Python script, but I try to avoid third-party plugins, if I can. Maintenance can be an issue, especially with fast-moving software like HA.
I declare an input_boolean, which in turn is wrapped around by a binary_sensor, the “virtual” motion sensor. Technically, the input_boolean is enough for everything we do here. However, declaring a binary_sensor allows us to easily look and act like a motion sensor, when changing the device class the customizations:
Customization
binary_sensor.motion_kitchen:
  device_class: motion
Here, I set the device class, making sure that states are correctly named, the icon is adjusted, etc.
Automation
Now the new input_boolean needs to be connected to the original sensor, in my case binary_sensor.tradfri_motion_sensor. This is done via automations.
- id: kitchen_motion_detected
  alias: Kitchen Motion Detected
  trigger:
  - entity_id: binary_sensor.tradfri_motion_sensor
    platform: state
    to: 'on'
  action:
  - service: homeassistant.turn_off
    entity_id: script.motion_kitchen_timed_off
  - service: input_boolean.turn_on
    data:
      entity_id: input_boolean.motion_kitchen_raw
- id: kitchen_motion_ended
  alias: Kitchen Motion Ended
  trigger:
  - entity_id: binary_sensor.tradfri_motion_sensor
    platform: state
    to: 'off'
  action:
  - service: script.motion_kitchen_timed_off
There is one little trick in here: The sensor is turned off via a script, three minutes after it is turned on. However, if the original motion sensor is triggered again, we need to abort this sequence, making sure the motion sensor remains on. Thus, I had to move the off-sequence to a script, which is stopped, as soon as motion is detected again.
Script
motion_kitchen_timed_off:
  sequence:
  - delay: 00:03:00
  - service: input_boolean.turn_off
    data:
      entity_id: input_boolean.motion_kitchen_raw
This script turns off the motion sensor three minutes after motion has been detected.
Conclusion
I can now base all my automations off a motion sensor that shows “on” when motion is detected and “off” when no motion is detected and no longer need to deal with timeouts in the using devices. This makes using the Tradfri motion sensor in Home Assistant significantly more comfortable.
Note that this wrapper is of course limited to the temporal resolution given in the script. Potentially it is possible to bring that a little closer to the behavior of the sensor, e.g., if it exhibits a dead time of two minutes, rather than the given three minutes. For my purpose, controlling lights, however, this is sufficient.