
After many years of using small, cramped corners to set up my computer equipment, I used the chance of a new spacious flat to also build a nice, big desk. I feel there are few things more luxurious to have than space, especially, when not needed. That’s the main philosophy for this new setup. Additionally, a sleek, minimalist design was required, while at the same time offering sufficient storage space for a large number of devices, cables, etc.
Furniture
I have been looking around for the right furniture for a long time. There are of course many beautfiful off-the-shelf desks out there, but they are usually not fitting for one reason or the other. Often dimensions are not as required and, even more often, the price is just too high. Take e.g., the FURTIF Large Desk: A beautiful piece of furniture, but a few thousand Euros was not what I wanted to spend.
On the other hand, although IKEA furniture is not always the most appealing, especially in terms of quality, one can certainly not complain about their pricing. And having an IKEA literally around the corner made me look deeper into customized desks based around IKEA furniture. IKEA Hackers is of course always a good source of ideas. I also found two setups, which I took heavy inspiration from:
Both are beautiful in their own right, but not exactly what I was looking for. The available kitchen cabinets simply didn’t fit the dimensions I was looking at and where also rather costly. On the other hand, I really liked the printer compartment and the continuous working surface, extending inbetween the cabinets. For Carley and Aaron’s Sanctuary, the doors are not really my style and I also wanted a slightly cleaner setup. The drawers came out really nice there, though. Something that I planned but did not manage to build properly and eventually scrapped.
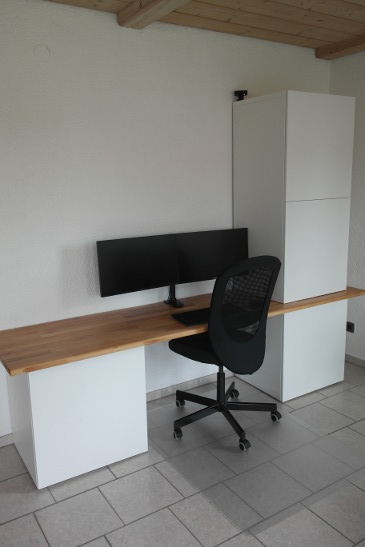
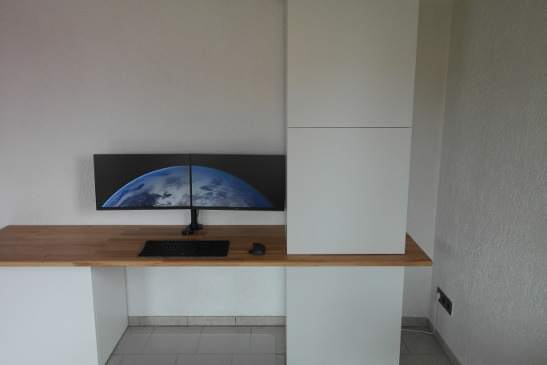
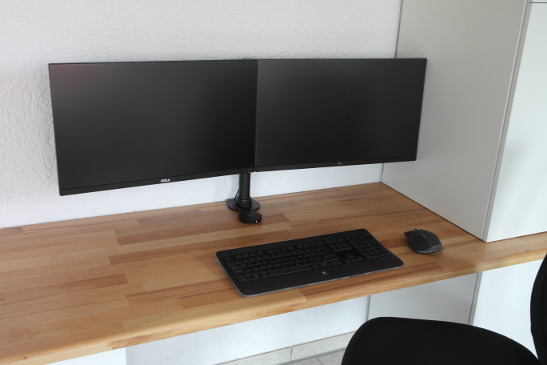
For the table top, I have long been contemplating a (faux) concrete tabletop, but in the end decided for a plain wooden one. So much less work and fits the wooden ceiling of the flat better. I got an offer for a birch countertop at the DIY store around the corner. It came in at about 50 Euros, plus oil and sanding paper. Countertops are of course not ideal for desks, as they are only 60cm deep. Typically, you want something a little deeper, some 80cm, to gain a bit of distance from your screens. As space is, however, not infinite and I didn’t want the desk to dominate the whole living room, 60cm is a good compromise, leaving enough space for the dining table behind. In width, I just use the full countertop at 240cm. Why? Simply because I can. Space and luxury again.
For cabinets, I decided that I want to have them as large as possible, while at the same time keeping the cost low. Therefore, I went with IKEA Stuva kids room cabinets. These cabinets are really not the most stable ones, but they are sufficient for the purpose here. In fact, they are quite suitable in their dimensions, as they are 50cm deep, allowing an additional 10cm of room, compared to the more expensive BESTA cabinets, and thus also stabilizing the tabletop even better. The doors of the Stuva cabinets are really not acceptable, however. Luckily, their dimensions are identical to the Besta cabinets, and I thus used the simple plain white Besta doors instead. I did not mount the push-to-open buttons, as I can easily grab the side of every door to open. Due to the quality of the Stuva cabinets, these are rather light and adding the push-to-open button might not be ideal for the cabinet located on the top. It might shift.
Here is the full list with prices at the time of writing:
- 1x IKEA Stuva Corpus 60x50x128 cm, 45 Euros
- 2x IKEA Stuva Corpus 60x50x64 cm, 40 Euros each
- 4x IKEA Lappviken door, 60x64 cm, 10 Euros each
- 4x IKEA Besta soft close hinges 2pc, 10 Euros each
- 1x Hagebau Birch Tabletop, 50 Euros
Thus, the price for the furniture sums up to 255 Euros. A fair price, I think. Especially considering the size of the desk.
You might also want to add shelfs inside the cabinets. I currently have two Stuva Grundlig shelfs (8 Euros each) installed, but might need to add more later on.
I did not mount the feet of the top shelf, placed on top of the tabletop, as I did not like the large spacing between tabletop and shelf in that case. Instead, I placed two layers of felt pads all around the shelf, works for me.
I also added an IKEA Flintan desk chair and a floor mat, which I still had from my former setup.
Hardware
Furniture is one part to a desk, but the computing hardware and accessories are just as important.
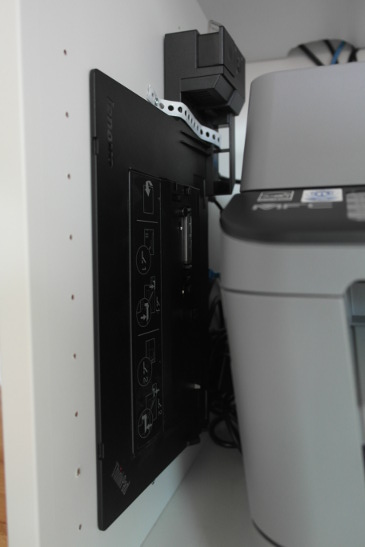
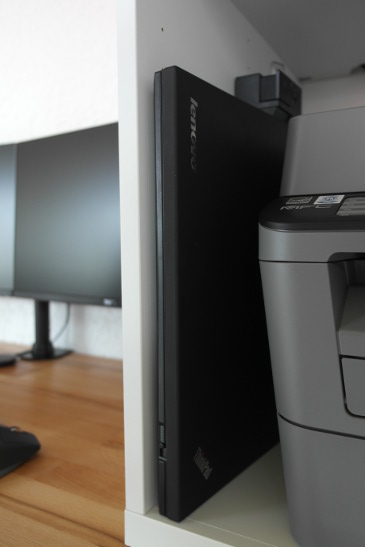
I am a big fan of ThinkPads and already had a Lenovo ThinkPad T430 running, which I bought used (display set) some years ago for about 300 Euros. As I use the version without a dedicated graphics card, the heatpipe had some additional capacity and I upgrade the original Intel Core i5 to an Intel Core i7-3610QM. I also upgraded the RAM to 12GB and installed a 120GB Samsung Evo 750 SSD. I removed the UltraBay DVD drive and installed a HDD bay instead, which now houses the original 500GB HDD. Not particularly much storage, but I have Synology DiskStation for everything else. Having bought the laptop and CPU used, the price of this laptop is a little over 500 Euros. Not the cheapest setup out there, but I claim that the performance and durability I am getting out of this is not comparable to anything in its price range. I added a docking station (Lenovo ThinkPad Mini Dock Series 3 Type 4338), which is compatible with this laptop and has a single USB 3 port and two DisplayPorts, both not available on the original docking station for this laptop.
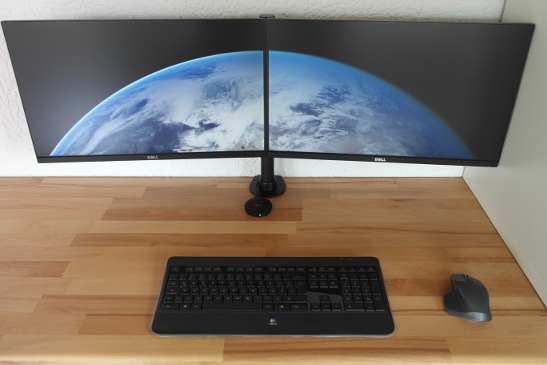
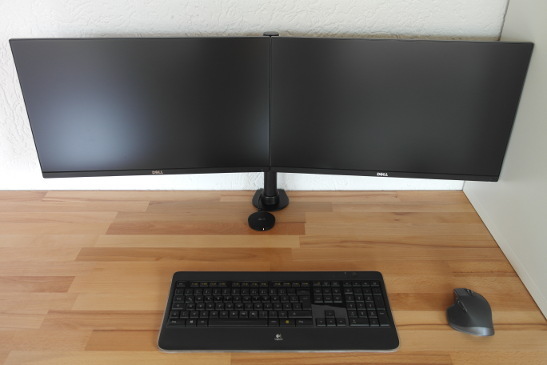
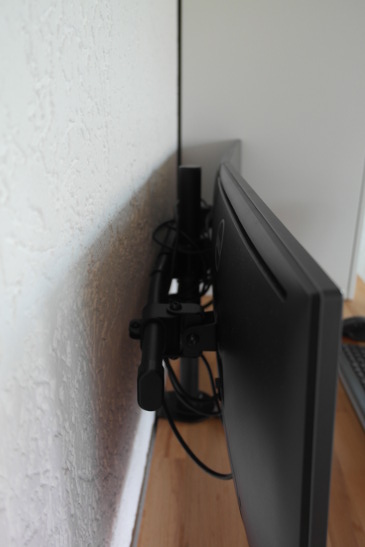
In my last job I had two Dell U2414H monitors. I have dreamed of having such monitors at home as well ever since. They are simply gorgeous to look at, even when turned off. The minimal bezel is just amazing. And the IPS panel inside is still state-of-the-art, assuming one is happy with Full HD resolution. I managed to get two of these used for 250 Euros combined. Again, a fair price. These displays also come with an integrated USB 3 hub, compensating for the single USB 3 port on the docking station. I have long been thinking about mounting them to the wall, getting rid of any visible connection to the table, which would probably the cleanest and most flat approach. However, I wanted a little more flexibility, in case the desk will be moved, and decided to go with a factory new Ricoo TS7811 dual monitor mount for 40 Euros instead. I assembled this slighty differently than intended, with the monitor arm on the rear of the vertical pillar, to save space. With a 60cm tabletop, one can’t afford to spend an additional 5cm on the monitor mount.
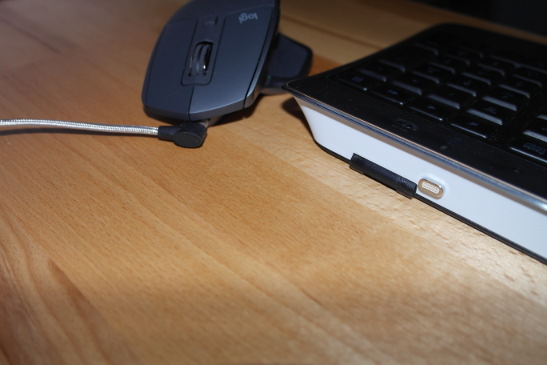
For keyboard and mouse, I went with Logitech K800 and MX Master 2S. Keyboard is slightly used and mouse second hand, but new for combined 80 Euros. As both are wireless, I did not need to worry about cleaning up the wires. I wanted to have a charging cable available though. I store this behind the screen. I use a reversible, magnetic USB cable, with the plugs connected to the keyboard and mouse at all times and pull out the cable when needed. When not needed, the magnetic plug nicely sticks to the Ricoo monitor mount, hinding away behind the screens.

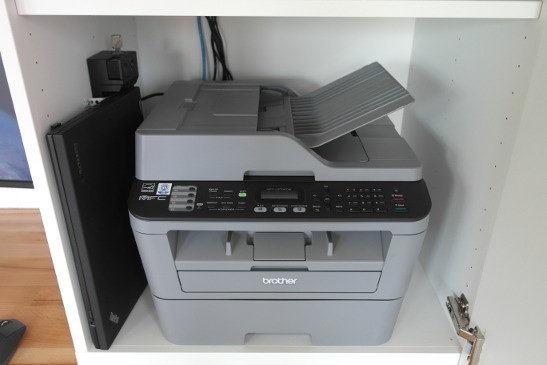
I also use a Brother MFC-L2700DW, a highly reliable laser printer and scanner combo, for a good price, though a little limited in features. Check out this article to learn how to work around the missing features in software. This printer fits the Stuva cabinets very well and even leaves a bit of space for cables at the back and my laptop on the side. I mounted the docking station vertically onto the inside of the Stuva cabinet, allowing fairly easy access to the laptop, but keeping it tucket away neatly, without consuming too much space. As I did not only want to rely on the hooks attaching laptop to docking station, I mounted it so that the laptop stands on the bottom of the cabinet, supporting its own weight. This does of course have the disadvantage that the ports on the right side of the laptop are no longer accessible when docked. As I only need to use the SD card reader every once in a while, that is acceptable for me.
The small little puck below the monitors is an old LG WCP-300 Qi wireless charging pad.
On top of the highest Stuva cabinet, I installed a PlayStation 3 Eye. This is a USB webcam with an integrated surprisingly good 4-microphone array. I use the microphone with Snips for offline voice recognition, connected to my home automation system. The camera can directly feed into the home automation system and be used for surveillance purposes or simply streamed to any screen in the house. But that shall be the scope of another article or maybe even a series.
For sound, I either use the integrated speakers of the laptop, some Sennheiser PXC 550 Wireless I got from work, or my aged Bose QC3.
Photos
Here are some more photos:
Improvements
Nothing is ever perfect. These improvements would make sense:
- I think of adding lighting, as the corner where the desk is located can be quite dark at night. I am still contemplating different lighting options.
- Some drawers would be nice. While the IKEA Stuva series does offer some simple wire mesh drawers, I prefer something more stable. But I have not yet found something suitable.
- Bolting it together: Currently, everything is loosely placed on top of each other, stabilized only by its own weight. In future, I want to properly mount things together and onto the wall for stability.
- Adjusting the doors: I absolutely hate adjust doors to make them straight and aligned to each other. But I guess it has to be done at some point. Crooked doors are not OCD-compatible.
- Lights for printer: As the LCD of the Brother L2700DW is not lit, it can be a bit hard to use at night. I am thinking of adding some lights there.