
- A little bit of theory
- Comparing Lights Side-by-Side
- Manual RGBW Calibration
- Storing Calibration Points in Home Assistant
- Creating a Template RGBW Light
- Cubic Interpolation Script
- Results
- Conclusion
IKEA’s Tradfri series offers a very affordable entry into smart lighting, with a range of ZigBee-controlled RGB and RGBW bulbs. While they work well for color effects, there’s one glaring shortcoming: the RGB lights struggle to reproduce accurate white color temperatures. Warm whites can appear too pink or yellow, and cooler whites can lean slightly green or blue.
Over the last few weeks, I experimented with a method to improve white spectrum consistency across multiple Tradfri bulbs in my living room. Here’s what I did and how I implemented it in Home Assistant.
A little bit of theory
I probaby won’t do a good job explaining color theory, due to my own lack of complete understanding but some basics are sufficient here. There are multiple ways to define a color. Among these are RGB, a combination of the colors red, green, blue; Hue/Saturation; and xy coordinates in the CIE diagram. The spectrum of cold white to warm white can be expressed as part of the Planckian Locus:
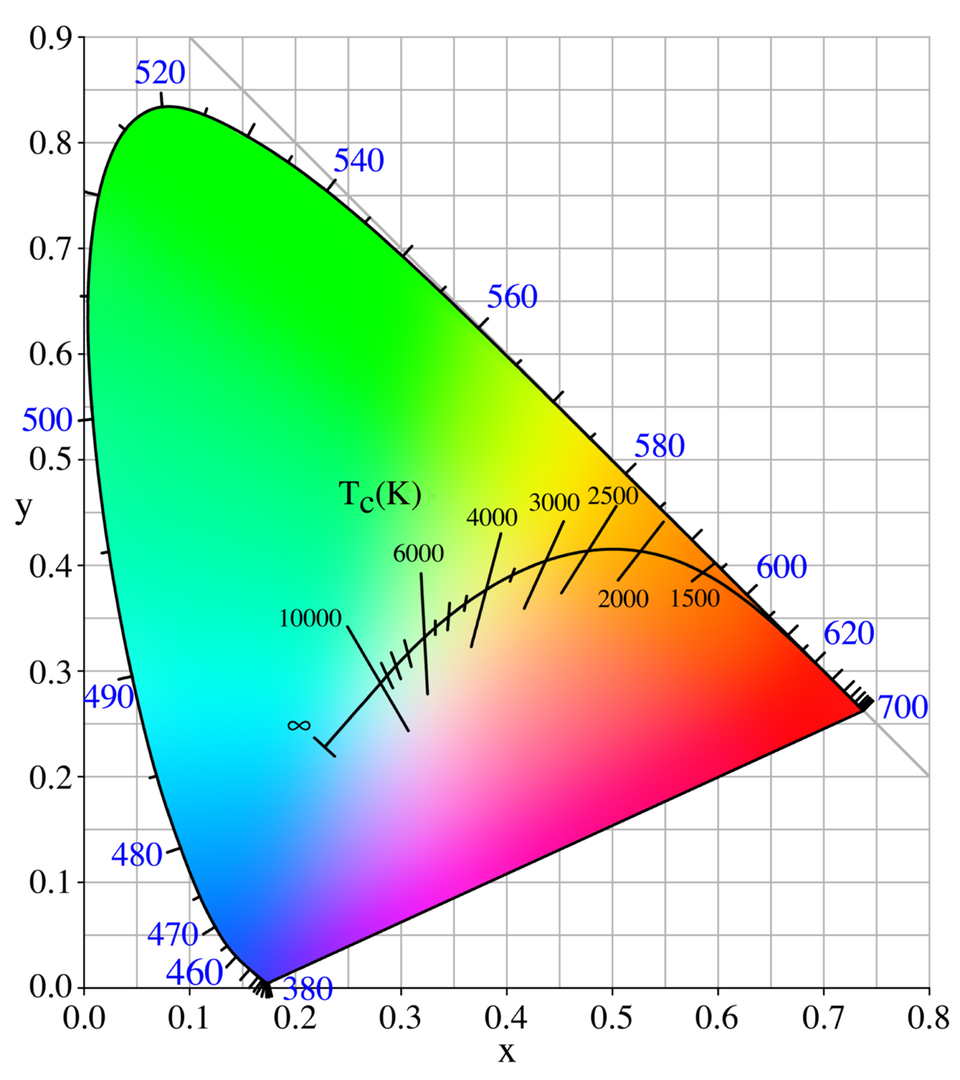
When setting different white temperatures, the RGBW lights create this from mixing the available red, green, blue and white LEDs. Note that this differs from how RGBWW or white spectrum lights create the white spectrum, as these mix warm and cold white LEDs and through this achieve much “cleaner” whites. I use a white spectrum light as reference for my calibration.
Since we can’t change how the lights map the given temperature to their LEDs, we instead change the translation from color temperature to xy value. This way, we can shift the Planckian Locus in the CIE diagram and calibrate lights to each other. I performed the initial manual calibration with the RGBW values, as I found it easier to think of e.g., “adding blue”, “removing red” when adjusting the lights, compared to xy coordinates. Later, I read out the xy values at the calibration points of 2200K and 4000K via the Home Assistant Developer Tools:
{% set light_xy = state_attr('light.e14', 'xy_color') %}
X: {{ light_xy[0] if light_xy is not none else 'unknown' }},
Y: {{ light_xy[1] if light_xy is not none else 'unknown' }}
I switched from RGBW to xy, as the Planckian Locus is easier to interpolate along these coordinates, rather than considering each of RGBW individually.
Comparing Lights Side-by-Side
I started by placing different types of Tradfri RGBW bulbs next to each other:
- GU10 RGBW spotlight
- E14 RGBW candle bulb
To get a reference, I used a dedicated white spectrum lamp (in my case a Tradfri E14). By visually comparing the lights side by side, it became clear that the built-in RGB values from IKEA did not match the reference lamp’s white spectrum.
Manual RGBW Calibration
The next step was manual calibration:
- I adjusted the RGBW values of each bulb until the light appeared as close to the reference spectrum as I could get.
- The result was not perfect — no consumer RGBW light is — but it was significantly closer than the original settings.
Once I found satisfactory settings for the warm and cool ends of the spectrum, I recorded the xy color values (a point on the CIE spectrum) corresponding to:
- Warm / top end: ~2200K
- Cold / bottom end: ~4000K
These two points serve as calibration anchors for each bulb.
Storing Calibration Points in Home Assistant
Home Assistant allows you to attach custom attributes to lights. I stored the calibration points directly on each light entity, for example:
light.e14:
  calib_x1: 0.504
  calib_y1: 0.431
  calib_x2: 0.377
  calib_y2: 0.386
  calib_t1: 2202
  calib_t2: 4000

light.gu10_1:
  calib_x1: 0.352
  calib_y1: 0.38
  calib_x2: 0.502
  calib_y2: 0.406
  calib_t1: 4000
  calib_t2: 2202
These points allow us to map a requested color temperature to an xy value that actually looks correct on the specific bulb.
Creating a Template RGBW Light
To control multiple bulbs as one unit and hide the adaption behind a nice interface, I created a template RGBW light in Home Assistant:
light:
  - name: "Living Room Lights"
    unique_id: virtual_living_room_lights
    icon: mdi:lamps
    level: "{{ state_attr('light.e14', 'brightness') | int }}"
    temperature: "{{ state_attr('light.e14', 'color_temp') | int }}"
    hs: "{{ state_attr('light.e14', 'hs_color') }}"
    rgbw: "{{ state_attr('light.e14', 'rgbw_color') }}"
    min_mireds: 250
    max_mireds: 454

    turn_on:
      action: light.turn_on
      target:
        entity_id: light.alllivingroomlights

    turn_off:
      action: light.turn_off
      target:
        entity_id: light.alllivingroomlights

    set_hs:
      - action: light.turn_on
        data:
          hs_color: ["{{ h }}", "{{ s }}"]
        target:
          entity_id: light.alllivingroomlights

    set_temperature:
      service: script.set_calibrated_xy_color
      data:
        light_entities:
          - light.e14
          - light.gu10_1
          - light.gu10_2
        color_temp: "{{ color_temp }}"

    set_level:
      action: light.turn_on
      target:
        entity_id: light.alllivingroomlights
      data:
        brightness: "{{ brightness }}"

    supports_transition: "{{ true }}"
This template light reflects the combined state of all the individual bulbs and routes color temperature changes through a calibration script. Note that it only tracks the first light for level, temperature, color, etc. but that’s enough for me. Also note that most calls are directly passed to a group, which represents all my lights, but the temperature setting is passed to a script with the corresponding entities.
Cubic Interpolation Script
To translate a requested color temperature to a calibrated xy value, I use a Home Assistant script. This script does a cubic interpolation between the two reference points and is fairly accurate. It does lack accuracy beyond 4000K, but since my bulbs don’t support that, I don’t mind. The script takes a color temperature and multiple lights, which are turned on with their calibrated xy values, based on the calibration anchors defined above.
set_calibrated_xy_color:
  alias: Set Calibrated XY Color for Multiple Lights
  description: Converts mireds to Kelvin, calculates calibrated xy, and sets multiple lights
  mode: single
  fields:
    light_entities:
      name: Light Entities
      description: List of light entities to control
    color_temp:
      name: Color Temperature (mireds)
      description: Color temperature in mireds
  sequence:
    - variables:
        kelvin: "{{ (1000000 / color_temp) | round(0) }}"

    - repeat:
        for_each: "{{ light_entities }}"
        sequence:
          - variables:
              light_entity: "{{ repeat.item }}"

              x1: "{{ state_attr(light_entity, 'calib_x1') | float }}"
              y1: "{{ state_attr(light_entity, 'calib_y1') | float }}"
              x2: "{{ state_attr(light_entity, 'calib_x2') | float }}"
              y2: "{{ state_attr(light_entity, 'calib_y2') | float }}"
              t1: "{{ state_attr(light_entity, 'calib_t1') | float }}"
              t2: "{{ state_attr(light_entity, 'calib_t2') | float }}"

              xt: >-
                {{ (-0.2661239 * 10**9 / kelvin**3)
                   - (0.2343580 * 10**6 / kelvin**2)
                   + (0.8776956 * 10**3 / kelvin)
                   + 0.179910 }}

              xp1: "{{ (-0.2661239 * 10**9 / t1**3)
                       - (0.2343580 * 10**6 / t1**2)
                       + (0.8776956 * 10**3 / t1)
                       + 0.179910 }}"
              xp2: "{{ (-0.2661239 * 10**9 / t2**3)
                       - (0.2343580 * 10**6 / t2**2)
                       + (0.8776956 * 10**3 / t2)
                       + 0.179910 }}"

              x: >-
                {{ (x1 + ((xt - xp1) / (xp2 - xp1)) * (x2 - x1)) | round(4) }}

              yt_raw: >-
                {{ -0.9549476 * xt**3 - 1.3741859 * xt**2 + 2.091370 * xt - 0.167488 }}

              yp1: >-
                {{ -0.9549476 * xp1**3 - 1.3741859 * xp1**2 + 2.091370 * xp1 - 0.167488 }}
              yp2: >-
                {{ -0.9549476 * xp2**3 - 1.3741859 * xp2**2 + 2.091370 * xp2 - 0.167488 }}

              y: >-
                {{ (y1 + ((yt_raw - yp1) / (yp2 - yp1)) * (y2 - y1)) | round(4) }}

          - service: light.turn_on
            target:
              entity_id: "{{ light_entity }}"
            data:
              xy_color:
                - "{{ x }}"
                - "{{ y }}"
Results
After setting this up, the difference is noticeable:
- Whites appear consistent across multiple bulbs
- Warm whites are richer and less pink
- Cool whites are closer to neutral
While RGBW bulbs can’t perfectly reproduce the entire white spectrum, this method brings them much closer than stock IKEA settings, without buying expensive professional lights.
The virtual RGBW is not perfectly tracking these lights, but since I barely use it manually and automate setting the light based on the angle of the sun, this is not an issue for me so far.
{% set x = state_attr('sun.sun', 'elevation') | float(0) %}
{% if x <= 5 %}
  2200
{% elif x >= 40 %}
  4000
{% else %}
  {{ (2200 + (x - 5) * 51.42857) | round(0) }}
{% endif %}
Conclusion
With a bit of calibration and Home Assistant scripting, even cheap IKEA Tradfri bulbs can deliver a more accurate white spectrum. By storing calibration points, creating a template RGBW light, and using a calibrated interpolation script, you can control multiple bulbs with one unified interface and get much more realistic lighting throughout your home.